
You can wave goodbye to your full-coverage foundation (for now), because ultra-glowy, healthy-looking skin and natural makeup looks are pretty much the most timeless and biggest beauty trend this spring.
Our TikTok and Instagram ‘For You’ pages are still awash with fresh-faced influencers serving up juicy skin, brushed-up brows, a little lash action, maybe a lip balm and not much else. It’s all about applying the makeup so it sits on your skin as if it’s barely there.
Across the beauty-sphere, ‘skinimalism’ has gone from a major buzzword to the ultimate ideal – as brands have seen us shift our focus to upping our skincare, then paring back our makeup to show it off. The gist is a barefaced-but-better vibe. “Oh my skin? Just a bit of moisturiser, pals.”(Let’s just skip the fact it’s tinted).
How to achieve natural makeup
As for how to nail it like the pros? We asked celebrity makeup artist Nikki Wolff to tell us how it’s done. “If you’re layering a primer, foundation and highlighter, but it always turns out cakey, it’s because you’re not using a light enough touch.” She adds: “Makeup artists use very little product and lightly apply it to the skin, blending lots as we go. It’s how we can create a glowing base that still looks like skin.”
Hannah Martin, who is best known as being one of the royal family’s favourite makeup artists, also gives her two cents. “I’ve always believed that the key to natural-looking makeup involves prepping your skin well before application and then applying light layers, always creams and liquids first, followed by powder, with the right tools. The right tools really do make all difference – not least for ease of application but also for the overall finish.”
Here are 13 ways to achieve natural makeup looks:
1. Prep your skin
For a painting to look exactly how you want it, you need to have the ideal blank canvas. Think of your face as a clean, blank canvas. Your skincare routine needs to be in tip-top shape in order to get your best results when it comes to makeup. Use a gentle cleanser to make sure your face is nice and clean before applying products. Adding a chemical exfoliant into your skincare routine will also allow for a natural sheen to peep through before you start applying makeup.
Most importantly, don’t forget to keep your skin hydrated. A moisturiser with hydrating ingredients like hyaluronic acid is a good place to start. Something that will leave your canvas looking and feeling plump. Also it’s worth investing in one of the best toners to use post-cleanse, as they can help maximise subsequent skincare product absorption.
2. Create a your-skin-but-better base
There are many ways to create a light and barely-there base that will make people question if you even have any makeup on. You can go for a tinted moisturiser to subtly even out your skin tone without losing its true sheen. Alternatively, you can mix your liquid foundation with moisturiser to make it extra light and sheeny. Hannah Martin says: “To ensure foundation doesn’t look cakey, you must prep your skin according to you skin type, but also taking into consideration the texture of the foundation and ultimately how you’d like it to look on your skin.”
She then adds: “I say that because someone with dry skin might assume they can’t wear a long-lasting oil-free foundation, but if you prep well with emollient rich skincare you absolutely can and vice versa. Those with oily skin may be wary of dewy finish foundations but with light, water-based skin prep and oil controlling primers in oily areas you can.”
3. Spot conceal
A good way to prevent concealer from settling into fine lines and looking caked-on (which can instantly remove that natural glow) is to spot conceal. This simply means applying concealer where needed – so over dark circles, any dark marks you’re uncomfortable with or redness – and blend it in with a thin brush or tap it in with fingers.
4. Try a lash hack or go for under-eye false lashes
Having a low-key lash using mascara is quite difficult, and although they’re imperative to open up your eyes and make your face look more balanced and awake, it takes away from the natural look. However, there are nice mascaras out there that don’t require heavy layering to give you that definition. Alternatively, opt for razor-thin false lashes that sit under your eye – as these go almost undetectable and can look even more natural than mascaras.
Major tip alert from Hannah: “If you want big, dense lashes but don’t want to sacrifice definition, be sure to keep a spoolie brush with you when applying your mascara. As you layer your mascara, comb your lashes through with the clean spoolie to unclump your lashes and separate them to keep them looking defined.” She then adds: “If there are just one or two lashes clumped together, then use the tip of the spoolie to separate. I also like to use the clean spoolie to pull the lashes in the inner corner of my eye towards my nose for a more fanned effect but with less risk of getting mascara on my nose. The same can be said for fanning out lashes in the outer corner.” Noted.
5. Lightly define brows
Good brows can help frame the face – adding balance and structure. While they were once underrated, brow products are now many women’s desert island beauty product of choice. Opting for a harsh, uber-dark heavy brow defies the ‘rules’ of natural makeup, however you can still gently groom your brows for maximum definition without them looking ‘done-done’.
Opt for a clear gel to slick them upwards and outwards, so they look neat, or simply use a three-edge microfilling pen to fill in any gaps which make them appear fuller yet still natural. If you’ve gone a bit to heavy on the brow pen, you don’t have to double down — just go over it with a wet cotton bud to remove excess product.
6. Amp up the dewy glow
Amp up the dewiness and hydration look on the skin by slathering an illuminater or highlighter on the high points of the face. But according to Hannah, less is definitely more. “For the most natural-looking highlight, apply just a little cream or liquid highlight before your blush. Too much highlighter and it doesn’t look natural but a little under your blush creates that much coveted ‘lit from within glow’,” she says. You can also use a finishing spray for that extra sheen.
7. Tap-tap on the blush
A light blush never hurt anyone, and applying the ‘W’ blusher technique across your face will give you the most natural, gentle and diffused flush of colour. All you have to do is draw on ‘W’ with a cream or liquid blush – or place four dots which when blended together form that ‘W’ shape across the face. This will give you an effortless sun-kissed look. When it comes to applying blush for that barely-there look, I think you get the best finish when using liquids.
“Go over the top with a cream or liquid blush as they generally have a much more sheer finish than powders. You can dab onto the cheeks with your fingers, but for the most seamless blend buff out with a brush,” Hannah adds.
8. Small-small contour
Natural makeup usually would go against all contour rules, but with beauty, there are no rules. You can always amp up the cheekbones and jaw lines with some simple and muted contour tricks. Try reverse contouring, which simply involves lifting the face using a lighter contour in the higher points of the face. Alternatively, massage in any contour with hands as the warmth of your hands will make the product blend in more seamlessly.
9. Subtle bronzer placement
A subtle bronzer placement will add a splash of colour to the face. Alternate between bronzer or blusher to avoid too much product layering if you want to keep things simple. Focus the bronzer applications on the temples of the face to maximise the natural finish. Hannah then adds: “I love nothing more than a gel bronzer applied with a brush. It’s best to start with just a little bit of product and layer for more intensity than it is to apply a lot and then blend away.”
“As someone that loves a sun kissed-look, I love a gel bronzer formula because it’s sheer and gives a different finish than a powder or a creamy bronzer. You barely feel it, but you look like you have an actual suntan. You can use my Gel Bronzer on bare skin, mixed with your moisturiser, or with the a face oil for added luminosity,” says brand owner of Jones Road and MUA icon Bobbi Brown.
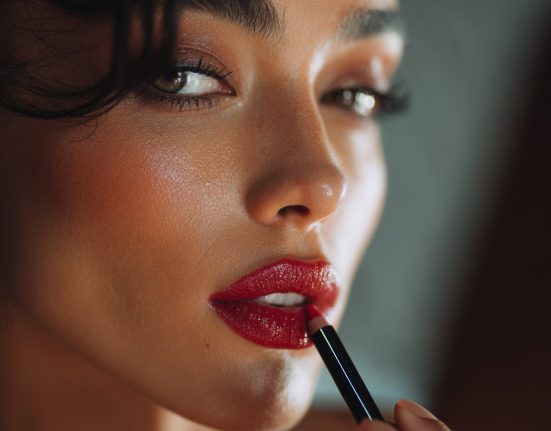
10. Diffuse your lip glow
Depending on your natural lip colour and lip line, you should either either play with lip liner or a gentle plumping gloss – or a mix of both (turn to Khloé Kardashian’s cherry cola lip look for inspo). For pink-hued lips and fairer skin, a lip oil could suffice. Glaze it over the bottom lip and smack them together for a gentle sheen. For dark skin, brown or dual-coloured lips, opt for a lip liner in a dark hue close to your natural lip line and rub lips together for the most seamless blend and natural gradient. Add some hydrating lip balm for that glazed finish.
11. Revive your freckles or beauty spots
Out-out makeup usually means high coverage – and when we go for high coverage, we hide all the quirks of the face like natural freckles and beauty marks. To bring back that no-makeup-makeup glow, amp them up using a freckle pen, or go over your beauty spots that may become hidden under concealer and a medium-to-heavy base.
12. Consider adding translucent or setting powder into your routine
If you have oily skin, you should consider a translucent powder that controls shine without compromising the dewy finish essential for that natural makeup look. Translucent powder is great to consider if you have fair skin, as the finely milled powder will appear almost invisible to the skin. However, if you have some melanin to your tone, setting powder or a loose powder may be a better option as it’s least likely to leave a white cast. Not all translucent powders are made equal, but going for something tinted is always a safer bet.
13. Use the right tools
Many expert and celebrity MUAs recommend using your hands for the most seamless natural makeup application. In fact, Bobbi Brown tells GLAMOUR: “I find that it blends better into the skin and helps you better achieve that ‘I’m not wearing any foundation’ look.” However, if you’re not keen on getting your hands dirty, then opt for a really good makeup brush collection for the most seamless finish or a Beautyblender for a diffused muted blend.
Hannah Martin is an advocate for a good set of makeup brushes: “I typically use two foundation brushes – one that’s dense but not hard, and has a flat head cut on an angle that magically blends foundation in moments. I also use a more traditional foundation brush but one that’s not as tightly bound as some – meaning it’s excellent for applying and blending lightweight liquids and creams, but also for getting into any corners of the face.”